Diagnostic & Hospital Equipments
Laparoscopy Equipment’s: The Top 5 to Buy for Your Hospital
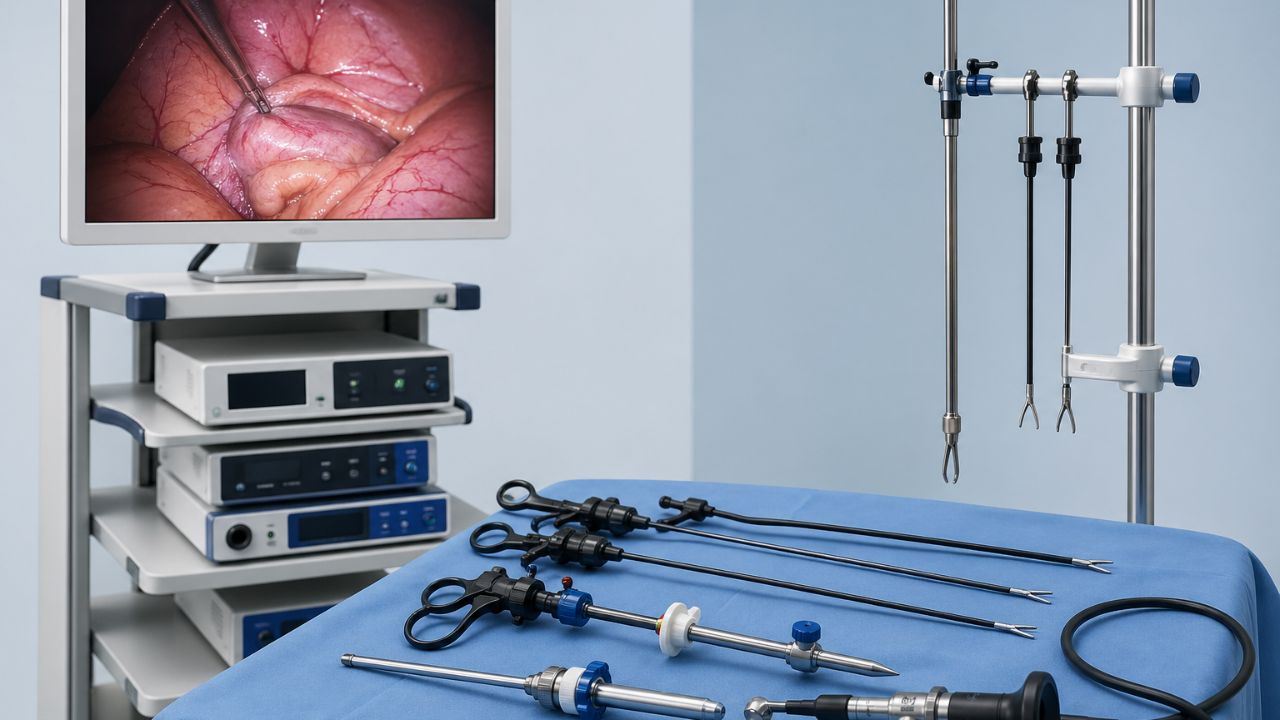
A hospital that uses advanced technology increases patient confidence and improves standard care. This is why big hospitals buy high-quality laparoscopy equipment’s to make surgery faster and better. The surgeon needs clear images and ergonomic tools to do his job in the operating room, this is where laparoscopic technology can be effective.
What is a Laparoscopy?
When your doctor mentions laparoscopy, you might be nervous. This procedure is also known as keyhole surgery. Instead of cutting a large incision to view your organs, the surgeon cuts a small opening.
How it works:
While you’re under general anesthesia, the surgeon makes 2 to 4 tiny cuts around your navel. First, the doctor blows a small amount of carbon dioxide into your abdomen to create enough space. Next, he or she will insert a laparoscope. The laparoscope is a thin tube that has a powerful light and a high-definition camera that takes live video and sends it to a monitor in the operating room.
If needed, the surgeon uses tiny instruments to remove an inflamed appendix or gallbladder, collect tissue samples (biopsy) or address issues such as endometriosis or ovarian cysts.
Once the surgery is complete, the surgeon relieves the gas and closes the small incisions with stitches or surgical glue. Unlike open surgery, which requires much energy to heal a large incision, the pain is less and there’re no permanent scars from the operation – they are barely noticeable.
To achieve this, surgeons use special instruments:

Visual System
The surgeon’s main tool is a thin, long telescope equipped with a high-intensity light and an HD camera on the end. This telescope serves as the surgeon’s eyes in the body of the patient.
The camera sends live, detailed images to large screens around the operating table so that the entire surgical team can see in clear detail the internal organs.
Creating Working Space
To create enough room for a surgical procedure, the team relies on an insufflator. With an insufflator, medical-grade carbon dioxide is injected into the abdominal cavity. This raises the abdominal wall like a tent. So, it makes it clearer and gives the surgeon more room to move his tools.
Access Ports (Trocars)
Instead of inserting tools directly into the incisions, surgeons use trocars (tubes made of plastic or metal) as entry points. They create a small incision and insert a trocar, through which any tools, including a camera, pass.
Specialized Hand Instruments
Laparoscopic instruments are 30 to 35 centimeters in length. Due to the small size of the incisions, the instruments used are also long and slender. These include:
- Graspers: Used like a pair of long tweezers, these instruments allow surgeons to hold, lift, or maneuver organs and tissue.
- Dissectors: Using curved tips, these tools will gently separate and thin delicate tissue layers.
- Surgical Scissors: Cut sutures or tissue with high accuracy.
- Suction-Irrigators: This handy instrument is used to rinse and drain the surgical area.
Most patients with bleeding problem will be treated with electrosurgical units, which use controlled electricity or ultrasonic vibration to cut and seal blood vessels.
Specimen Extraction
When a surgeon removes an organ like the gallbladder or appendix, they use a specimen retrieval bag. This is a compact, sterile pouch that opens up inside the body. The tissue is placed into the bag, then extracted through a small incision. This process prevents any infected material or stray cells from contaminating the rest of the body.
The Laparoscope
This long, slender tube is fitted with a high-intensity light and a high-resolution camera at its tip. The camera sends live images to a video monitor in the operating room, enabling the surgeon to view the internal organs with great clarity.
Trocars and Ports
Before inserting the camera, the surgeon must establish a pathway. They use a trocar, a pen-like instrument with either a sharp or blunt tip, to penetrate a small incision in the skin. Once inside, the trocar’s inner needle is removed, leaving behind a hollow sleeve known as a port. All other instruments are inserted and withdrawn through these ports, safeguarding the surrounding tissue.
The Insufflator
To ensure a clear working space, surgeons utilize an insufflator. This device pumps medical-grade carbon dioxide gas into the abdominal cavity, causing the belly to expand like a balloon and lifting the abdominal wall away from the organs. This creates a space to prevent inadvertent damage to healthy tissue.
Handheld Surgical Instruments
After positioning the camera and inflating the abdomen, the surgeon introduces specialized handheld tools through additional small incisions. These instruments are designed to fit through the ports and include:
- Graspers: Function like forceps to hold or maneuver organs and tissue.
- Scissors: Used to cut through different types of tissue and sutures.
- Dissectors: Assist in separating tissue layers without incisions.
- Electrosurgical Hooks: Use electric currents to cut tissue and seal blood vessels simultaneously, reducing bleeding.
- Needle Holders: Employed to grip and guide needles for sewing internal organs.
Laparoscopy Equipment’s: The Best 5
Selecting the right laparoscopy tools is essential to ensure surgical precision and patient safety. Listed below are five key devices used in modern operating rooms.
Encision AEM enTouch (Electrosurgical Instruments)
Encision tackles a high risk in laparoscopy: “stray energy.”
- Feature: This system uses Active Electrode Monitoring (AEM) technology, which surrounds the surgical tool with a protective layer that the generator constantly monitors.
- Advantage: If the tool’s insulation fails or a power surge occurs, the system automatically stops the electricity to prevent potential harm to the patient.
- Benefit: This provides maximum safety, enabling surgeons to work near sensitive organs without worry about unnoticed electrical burns during surgery.
Richard Wolf 8989.21 (Laparoscope)
Lens quality is vital for viewing the abdominal cavity. The Richard Wolf 8989.21 is among the best Laparoscopy equipment’s; that prodices clear visuals.
- Feature: It has a distortion-free optical system with a 10mm diameter and a 0-degree viewing angle and is built to withstand the high temperatures of sterilization.
- Advantage: The device provides a bright, high-definition image on the monitor and retains clarity even after many cleaning cycles due to its durability.
- Benefit: Surgeons gain a clear view of tissues, which enhances precision, reduces surgery time, and lowers the chance of errors.
Stryker 343-331-450 (Precision Hand Instruments)
Handheld instruments serve as the surgeon’s “fingers” during operations. The Stryker 300 series, specifically the 343-331-450, emphasizes tactile precision and responsiveness.
- Feature: These are ergonomic, rotating Maryland dissectors with lightweight handles and a precise jaw mechanism.
- Advantage: The handle is designed to fit comfortably in the hand, and the rotating shaft allows 360-degree movement without awkward wrist twists.
- Benefit: This reduces hand fatigue during lengthy surgeries, enabling surgeons to experience better “tactile feedback”. It makes it easier to sense tissue tension and conduct safer dissections.
Olympus ENDOEYE® (Imaging System)
The ENDOEYE transforms image capture with its unique all-in-one camera system.
- Features: This device employs “chip-on-the-tip” technology, placing the camera sensor right at the tip that enters the patient, which eliminates the need for a separate camera head connected to a scope.
- Advantages: There’s no risk of blurry images due to fogging or connection problems between the scope and camera. Its “all-in-focus” feature guarantees clear images whether the device is close to or distant from the organ.
- Benefits: It simplifies setup for medical staff and provides doctors with a stable, high-resolution video stream. Also, it removes the need to adjust lens during surgery.
Ethicon HARMONIC® Energy Devices
Ethicon’s HARMONIC series is at the forefront of advanced tissue sealing technology. It uses sound waves instead of conventional electrical currents.
- Features: The device uses ultrasonic vibrations to cut tissue and seal blood vessels simultaneously.
- Advantages: By opting for vibration over high-voltage electricity, it reduces lateral thermal spread, protecting nearby healthy tissue from heat damage.
- Benefits: This approach provides a clean surgical environment by lessening smoke in the abdomen, thereby maintaining visibility and enabling quicker tissue healing due to lower heat exposure.
Recommendation:
- For priorities in electrical safety, choose Encision.
- For superior visual clarity and reliable equipment, consider Richard Wolf and Olympus.
- For optimal cutting and sealing, Ethicon Harmonic sets the industry standard.
- For surgeon ease and accurate control, Stryker’s hand instruments are highly recommended.
Laparoscopic Setup and Components
This arrangement, often known as “the stack” or “the tower,” equips the surgeon with a clear view and the necessary space for operating through small incisions.
Below are the essential components needed for a typical laparoscopic operation.
The Imaging System
The imaging system consists of four main parts:
- The Monitor: High-definition screens positioned at the surgeon’s eye level, placed on opposite sides of the operating table for a clear view for all involved.
- The Laparoscope: Some lenses are angled at 30 or 45 degrees to allow a view around corners or behind organs.
- The Camera Head: Attached to the laparoscope’s end, this device converts the optical image into a digital signal.
- The Light Source and Cable: Contemporary systems utilize LED or Xenon light sources. A fiber-optic cable directs this light to the scope, and because these lights emit substantial heat, they must not be left in contact with drapes or skin.
The Insufflation System
Creating a “workspace” for surgery involves lifting the abdominal wall away from the organs.
- The Insufflator: This device controls the flow of carbon dioxide (CO₂) into the abdomen. CO₂ is chosen because it is readily absorbed by the body and does not support combustion when using electric tools.
- The Veress Needle or Hasson Trocar: These tools are employed to initially enter the abdomen. The Veress needle allows for a “blind” gas entry, while the Hasson technique uses a small incision for direct port placement.
- Pressure Monitoring: The insufflator maintains a consistent pressure, between 12 and 15 mmHg. Should the pressure drop, the machine automatically adds more gas to keep the abdomen inflated.
Access Ports (Trocars)
Trocars provide the entry pathways for all surgical instruments.
- The cannula: This hollow tube is left in the patient and has a valve to prevent CO₂ escape during instrument swaps.
- The Obturator: A sharp or blunt blade within the cannula that assists in piercing the abdominal wall. After positioning, the obturator is removed, leaving the cannula in place.
- Sizes: Most kits contain 5mm ports for smaller instruments and 10mm or 12mm ports for cameras and staplers.
Handheld Surgical Instruments
- Graspers and Dissectors: These instruments enable surgeons to handle tissue by lifting or separating layers of fat and muscle. The “Maryland Dissector” is a widely used curved tool for precise movements.
- Scissors: Surgeons use them to cut tissue or sutures, available in either straight or curved designs, like the Metzenbaum style.
- Suction and Irrigation: This handheld device permits the surgeon to cleanse the surgical area with saline while simultaneously removing blood or fluids to maintain a clear field of vision.
Electrosurgical Units (Energy Devices)
To manage bleeding and incise thick tissue effectively, surgeons use energy-based devices connected to a generator.
- Monopolar Cautery: Often found on tools like the “L-hook” or “spatula,” this uses electricity to both cut and coagulate and necessitates the use of a grounding pad on the patient’s leg.
- Bipolar Devices: These allow current to flow only between the two jaws of the tool, making them usually safer for sealing larger blood vessels as they keep the heat localized.
Laparoscopy Equipment’s Safety and Positioning
- Patient Positioning: Depending on the type of surgery, the team may adjust the bed into the Trendelenburg or reverse Trendelenburg position. This use of gravity aids in moving internal organs to facilitate the surgeon’s access.
- Cable Management: Nurses ensure that all light cables, camera cords, and gas tubing are securely attached to the sterile drapes to prevent tangling or equipment falling during the procedure.
How Long does Surgical Glue last after a Laparoscopy?
Normally, surgical glue remains on the skin for 5 to 10 days. As your skin renews and the wound heals, the glue starts to loosen. You may observe the edges curling or appearing like a peeling scab. By the end of two weeks, the glue usually falls off on its own.
How to care for the glue:
- To ensure the glue performs its function, adhere to the following guidelines:
- Keep it dry for 24 hours: Most physicians advise keeping the area completely dry for the first day post-surgery.
- Shower cautiously: After 24 hours, you may shower. Let warm, soapy water flow over the incision, and avoid using a washcloth or sponge directly on the glue.
- Gently pat dry: After showering, softly pat the area dry with a clean towel, refraining from rubbing the site.
- Avoid immersion: Refrain from bathtub soaking, hot tub use, or swimming until the glue naturally detaches and your physician approves. Prolonged moisture can weaken the adhesive.
- Skip ointments: Do not apply lotions, creams, or antibiotic ointments on the glue, as these can degrade the adhesive.
- Allow Natural Detachment: Though it may be tempting to peel the glue when the edges lift, don’t. Removing it prematurely might reopen the incision or increase scarring risk.
When to Consult Your Doctor
Contact your medical team if you observe any of the following issues:
- The glue comes off in less than five days, and the incision appears open.
- The skin around the glue turns bright red or feels warm to the touch.
- Yellow or green discharge (pus) emerges from beneath the glue.
- The incision emits an unpleasant odor.
- You experience a fever exceeding 101°F (38.3°C).
Why Laparoscopy is Used in Healthcare
Surgeons use laparoscopy for two key reasons: diagnosis and treatment. For instance, if endometriotic tissue is present outside its normal area, it can be removed during the procedure to relieve pain.
In addition, laparoscopy is used for operations such as appendectomies. This method uses a camera and specialized tools to safely remove an inflamed appendix. The smaller incisions result in a quicker recovery time compared to conventional open surgery.
A simple diagnostic laparoscopy usually takes 30 to 60 minutes. However, if more complex procedures such as an appendectomy or the removal of intricate endometriosis clusters are required, the surgery might last between 2 and 4 hours.
After the procedure, you might feel discomfort in your shoulders or abdomen, which fades within a few days.
Conclusion
Modern laparoscopic instruments enhance the results of surgery. It speeds up and makes operations safer. With the aid of ergonomic tools and high-definition cameras, surgeons are able to make precise incisions. This technique expedites recovery and lessens patient discomfort.
Having the proper equipment is vital as technology progresses toward robots and 4K resolution.
To stay up to date on developments in surgical technology, and other healthcare topics, follow us on all our social media handles.
Surgeons need a bright light to perform a surgery. This is why theater rooms require modern LED surgery lights. The days of using yellowish halogen bulbs are over. Today, LED systems allow crisper, more natural color that resembles daylight. They prevent eyestrain in long surgeries, and their bright beam focuses on the area being operated on. We’ll list some of the best surgical lights for an operating room.
These lighting solutions are an integrated part of the surgical team. They give the surgeon a depth of field that keeps his or her focus sharp, whether he or she is performing a procedure on the surface of the body or a procedure deep within the body.
Touchless controls make it easy for the team to adjust the intensity and position the lighting without interrupting their sterile field.
What are Surgical Lights?
Surgical lights, also known as operating lights or surgical lightheads, are medical devices used during surgeries to illuminate a surgical site. These lights may look like expensive lamps, but they can perform specific tasks not possible with normal room lighting.
The role of the spotlight is to provide a high-intensity light stream that won’t create shadows or produce excessive heat. Here’s how they work and why they matter in an operating room.
Shadow Reduction
Surgical lights use several bulbs or clusters of LEDs, angled and spaced apart so that the beams overlap each other. If one hand blocks the path of light, the other fills it in. This wraparound method ensures the surgeon sees the tissue they are working on.
True Color Accuracy
Ordinary bulbs have a yellow or blue tint that can make organs look discolored. Surgical lights appear like natural daylight to help the team see the body’s real colors.
Heat Management
If an operating light reaches a certain temperature, it may dry out the tissues or cause discomfort for the surgical team during long procedures. Modern surgical lights use “cool light” produced by LEDs. LED lights beam so bright light without raising the temperature of the surgical area.
Light Intensity and Focus
Almost all of the lights allow the surgeon or nurse to adjust the brightness levels (in lux) based on the extent of the job at hand.
Reliable
Surgeons can snap on a cover of a sterilizer over these handles and easily change the location of the light without coming into contact with their gloves. The arms are balanced against the body of the light, so it remains exactly where it is supposed to be without moving.
Surgical Lights Configurations
- Ceiling-Mounted: Usually used in permanent operating rooms. They save floor space and allow the maximum range of motion.
- Mobile Lights: These lights are on wheels and plug into the wall. They are used for minor procedures or as backup light in a rescue situation.
- Headlamps: Some surgeons wear a light on their forehead so they can shine a beam exactly where they want, especially during heart or brain surgery.
Best Surgical Lights for Operating Rooms
Here are five of the best LED surgical lights on the market, reviewed by what they do and why they matter.
Steris Harmony iLED
A special feature about the Steris Harmony iLED is its optical precision. It uses a series of high-quality lenses that overlap to form a single solid column of light. This design ensures the consistency of light on the surgical site, even if the surgeon’s head or shoulder gets in the way.
Features: One of the features of the Harmony iLED is the individual control of the LEDs. Instead of a single large bulb, it uses dozens of individual LEDs with custom lenses. It also has “Spot Adjustable” technology, which allows the surgeon to adjust the size of the beam without moving the light head. It has a high Color Rendering Index (CRI), so tissues look exactly as they should under natural light.
Advantages: The light head has no moving parts. Many lights have mechanical focusing parts that can break down after a while. This is done electronically by the iLED. It also has a “Suspension Advantage” where the arms move smoothly and stay right where you pull them. It does not drift, which is a common problem with cheaper models.
Benefits: It decreases eye fatigue. The light is constant and similar to natural daylight, so the surgeon’s eyes do not need to adjust to bright or dim spots. In addition, LEDs produce virtually no infrared heat, so the surgical site stays cool. This prevents the tissue of the patient from drying out and also provides comfort to the surgical team during long, multi-hour procedures.
Dräger Polaris 600 Surgical lights
The Dräger Polaris 600 is built for the modern operating room. It’s a pared-down system that removes the clutter associated with older lighting rigs.
Features: This light has a sterile touch control handle. That means the surgeon can adjust the light intensity and the color temperature right from the sterile field without reaching for a wall panel or asking a circulating nurse. It also includes a “Mobile App Control” option that allows staff to pre-select lighting configurations for certain types of surgery.
Advantages: The Polaris 600 is quite light. For hospitals using laminar flow ventilation systems, the head’s thinness and aerodynamics are vital. The air that maintains the room’s sterility is not blocked. The ability to change the color temperature is an additional benefit.
Warm white and cold blue-white lights are switchable. When you need to differentiate between different types of tissue, such as blood vessels and nerves, this is useful.
Benefits: The enhanced workflow allows surgeons to adjust the light with the sterile handle. Also, it improves safety; the light is equipped with an HD camera system capable of recording or streaming surgeries for educational use without increasing overhead clutter. This feature is suitable for teaching hospitals.
Maquet Volista (Getinge)
Under the Getinge brand, Maquet is a popular name in operating room equipment. The Volista series is their leading lighting solution, specifically to address the issue of shadows in the surgical environment.
Features: The Volista has a “Shadow Management” mechanism that is patented. The light head’s many LEDs are configured to offer continuous lighting from various perspectives. Moreover, it has a “Boost Mode,” which is useful for deep-cavity surgeries where visibility is poor. It has a dedicated green ambient light mode for minimally invasive (laparoscopic) procedures.
Advantages: The Volista’s best feature is its ability to regulate shadows. The light “wraps” around obstructions to maintain illumination of the wound site even when many persons are bent over the patient. Another momentous benefit is the construction quality; the light head is sealed, which makes it easy to clean.
Benefits: Shadow management takes control once the light is positioned, removes the need for frequent human adjustments. For laparoscopic procedures, the green ambient light is a huge benefit because it doesn’t reflect on the video monitors. During keyhole procedures, it reduces errors.
Stryker Visum LED II
The Visum LED II is designed for deep-tissue visibility and dependability, and Stryker is a house-hold name in the surgical industry. It is a workhorse lamp made to withstand the demands of orthopedic suites and high-volume trauma hospitals.
Features: The brightness of 160,000 lux offered by the Visum LED II is at the upper end of what is safe and effective for human vision. Its large-diameter light heads generate a broad field of lighting. It has an exclusive heat-dissipation mechanism that draws heat out of the back of the light head and away from the LEDs.
Advantages: Some lights appear excellent at first glance, but as you go deeper into an incision, they become faint. Even at a distance, Stryker’s optics maintain a bright beam.
This implies that when the table is slanted or the surgeon switches from superficial to deep tissue surgery, the light doesn’t need to be changed as much.
Benefits: The surgical team doesn’t have to constantly divert their focus to reposition the light because of the depth of field. It offers a stable, daylight-like atmosphere that facilitates the identification of small structures, which is essential for complex orthopedic or vascular repairs.
Mindray HyLED 9 Series
The Mindray HyLED 9 Series is a high-performance light with an emphasis on “smart” technology and ergonomics. It is made to be among the thinnest light heads available, which sets it apart from the heavy lights of the past in both appearance and feel.
Features: The HyLED 9 has a special “cross-shaped” design. In addition to being aesthetically pleasing, this improves the flow of air around the light head. “Automatic Illumination Control” is another feature. This sensor-based technology automatically increases the power of the remaining LEDs to make up for the lost light when it detects that an object is obscuring an LED.
Advantages: It’s better for smaller hospitals. Surgeons can select a warmer light for the skin and a cooler light for bone and internal organs. There is no flickering and a seamless transition between these settings.
Advantages: The design’s aerodynamic form keeps the sterile air from being disturbed. It reduces the chances of surgical site infections. For the surgeon, it removes the “dimming” effect that occurs when they lean in for a closer examination.
How to Choose the Best Surgical Lighting for Your Operating Room
Test the Drift
A light is only beneficial if it remains where you place it. Poorly balanced suspension arms may cause the light to drift from its target, and that will require constant adjustment.
- Ease of movement: Can one nurse or technician move the light?
- Stability: Does it remain locked in position once you set it?
- Range of motion: Can the arm cover the full table, whether vertical or horizontal?
Integration
Several surgical lights have options to integrate HD or 4K cameras directly into the light head. Even if a camera isn’t necessary now, selecting a “camera-ready” model allows you to add video capabilities later for education, documentation, or remote consultations without replacing the whole system.
Easy to Sterilize
Choose light heads with smooth, seamless surfaces.
Avoid exposed screws or deep grooves, as these can harbor dust and bacteria.
Sterilizable handles: Make sure the center handle can be removed easily.
IP Ratings: Buy lights with a high Ingress Protection (IP) rating.
Best surgical lights Checklists
LED Technology: Offers longer lifespan and reduced heat compared to halogen.
Illumination Intensity (Lux): Typically ranges from 100,000 to 160,000 Lux.
Light Field Diameter: Should cover the surgical site adequately but be adjustable for smaller incisions.
Battery Backup: Confirm the system connects to the hospital’s emergency power or has an internal backup.
Read also: Top Endoscopy Systems for 2026 (High-definition Imaging Compared)
Final Thoughts on the Best Surgical Lights
Professional surgical lights should have clear, shadow-free vision without excessive heat production. High-quality LEDs are ideal because they maintain a cool environment, still deliver natural and precise color.
So if you’re looking for the best surgical lights, choose lighting systems with flexible, balanced arms. Reliability is essential; consistent and flicker-free performance reduces eye strain and enhances focus during long operations.
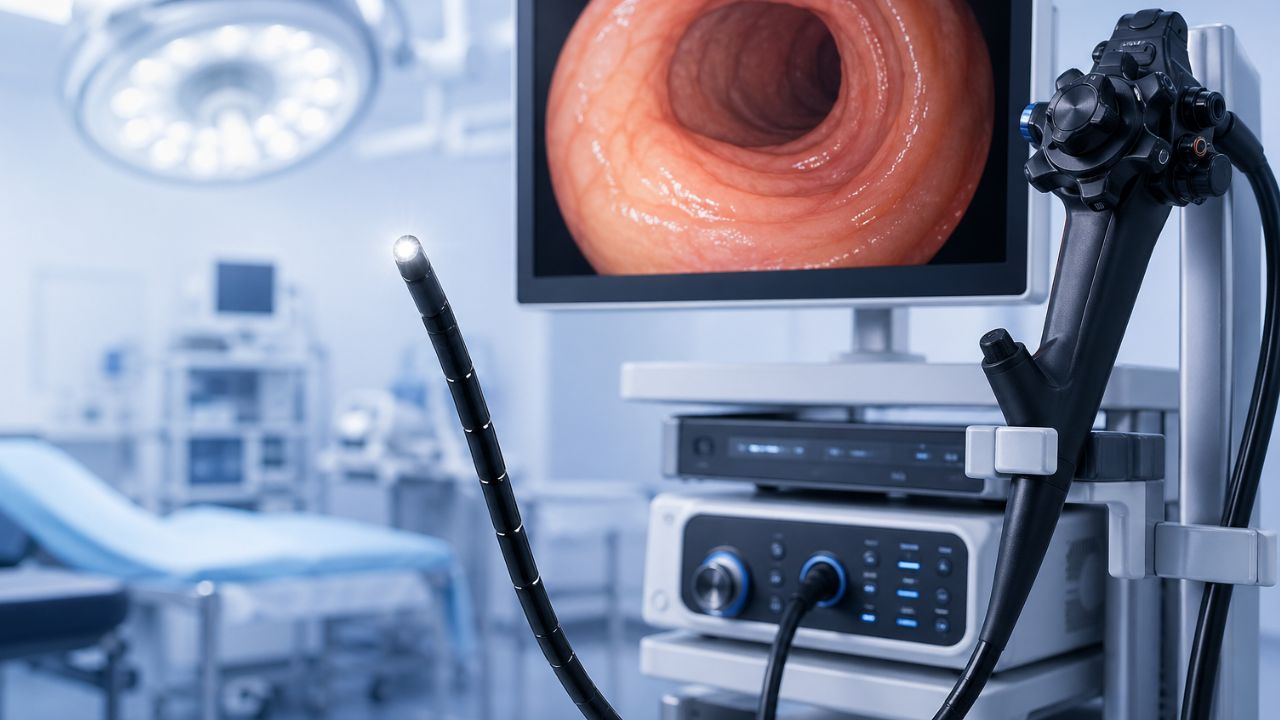
Doctors can look inside your body, take pictures or videos of your organs and tissues, and then use those images to detect, and treat health problems without having to do surgery. This is what endoscopy is like today. We’ll discuss the top endoscopy systems on the market in 2026.
Olympus and Fujifilm are among the best companies. Their equipment turns small textures into clear images. Olympus is better because it uses special light filters that make small blood vessels stand out in green or red. This makes it easier to find flat growths that are usually hard to see.
Fujifilm works differently. They use four LED bulbs to mix light in a way that shows the real color of internal organs without any delay. At the same time, the current Pentax models focus on digital sharpening, which keeps videos clear even when the camera moves quickly.
These systems improve standard video as they add smart overlays that show areas of concern in real time. The upgrade from rough video to 4K clarity allows doctors to detect any abnormalities accurately.
What is an Endoscopy System?
An endoscope is a long, thin, flexible tube with a small camera and a bright light at the end. The doctor starts the process by putting the tube through a natural opening, like the mouth or nose, or through a small cut in the skin. The camera records high-definition video of the inside of the body as the tube moves through it.
This video goes back through the tube and appears on a big screen in the exam room. The doctor watches this live feed to look for signs of swelling, redness, blockages, or abnormal growths.
Modern systems provide more than just a view. They have extra channels, small holes in the tube that allow doctors to slide tiny tools down to the tip of the tube. With these tools, a doctor can cut off a small piece of tissue to run a test, stop bleeding, or even remove a growth on the spot.
Interestingly, these systems use natural openings or small cuts, which means they are less painful and require less time to recover than traditional procedures.
What are the three types of Endoscopy?
Doctors put endoscopies into groups based on what part of the body they look at. Each uses a thin, flexible tube with a light and a camera to view inside the human organs. The types are:
Upper Endoscopy
This test looks at your digestive tract from the throat to the top of the small intestine. A doctor uses a scope to check for ulcers, inflammation, or blockages in your esophagus, stomach, and the first part of your duodenum. If you have heartburn, stomach pain, or trouble swallowing, they may perform this test.
Colonoscopy
The doctor passes the scope through the rectum and looks for polyps, tumors, or areas of bleeding. This test is used for colorectal cancer screening.
Bronchoscopy
The doctor places the scope through your nose or mouth and into your lungs. The scope examines your windpipe and bronchial tubes to know exactly the cause of chronic cough, identify a blockage, or obtain a tissue sample if there is symptoms of lung infection or mass.
What Diseases can be Detected by an Endoscopy Systems?

When asked, “What diseases can be detected by endoscopy?” the answer includes several conditions that affect your digestive system.
Examination by an experienced, qualified healthcare professional allows the doctor to examine the stomach to find the cause of persistent stomach pain, bleeding, or difficulty swallowing. During this examination, the doctor can look for:
Ulcers: The camera reveals open sores on the lining of the stomach or the start of the small intestine. These cause burning pain and can lead to internal bleeding if the fails to treat it.
Inflammation: If your stomach or esophagus appears red, swollen, or irritated, the doctor notes conditions like gastritis or esophagitis. This often explains why you feel constant heartburn or nausea.
Gastroesophageal Reflux Disease (GERD): In this case, the scope will check if there is damage to the esophagus from stomach acid moving in the wrong direction.
Celiac Disease: Doctors may remove a small piece of tissue to see if your immune system is causing damage to your small intestine after you eat gluten.
Growths or Polyps: The camera identifies abnormal cells and can be used to take them out before they have a chance to develop into something more serious.
Cancer: If an area of concern appears abnormal, the doctor performs a small biopsy. Lab analyses of this tissue will confirm whether or not you have cancer of the esophagus, stomach, or small bowel.
Narrowing or Blockages: At times, scarring or tumors can cause parts of the digestive tract to become too narrow, making it difficult for food to pass. Endoscopy helps locate exactly where these blockages are.
Endoscopy Systems for Modern Hospitals: The Best Equipment’s
The equipment you choose can affect the accuracy of diagnostics. Below are the top five endoscopy systems on the market.
Olympus EVIS X1
The Olympus EVIS X1 is a top pick for GI departments that want the latest diagnostic technology. This system focuses on early detection and is user-friendly.
- Feature: It has Extended Depth of Field (EDOF) and Red Dichromatic Imaging (RDI) technologies.
- Advantage: EDOF ensures that both close and distant tissues are in focus without needing adjustments, while RDI helps visualize deep blood vessels more clearly.
- Benefit: Doctors can perform procedures faster and spot hidden lesions or bleeding more accurately.
Fujifilm Eluxeo 7000 Series
The Fujifilm Eluxeo system is known for its exceptional lighting capabilities. It’s a versatile tool suitable for both regular screenings and complicated treatments.
- Feature: It uses Multi-Light Technology with 4-LED illumination, plus modes like Blue Light Imaging (BLI) and Linked Color Imaging (LCI).
- Advantage: These modes make the contrast between healthy and abnormal tissues clearer, showcasing mucosal patterns distinctly.
- Benefit: This clarity helps doctors identify polyps and tumors immediately. So it reduces unnecessary biopsies and improves patient care.
Pentax Medical OPTIVISTA EPK-i7010
The Pentax OPTIVISTA combines high-definition imaging with digital enhancements. It’s praised for its easy-to-use interface and fast image processing.
Feature: It includes i-SCAN technology and Twin Mode display.
Advantage: i-SCAN applies digital filters to enhance surface textures in real-time, while TwinMode lets doctors view both original and enhanced images side-by-side.
Benefit: Very useful for mapping and detecting lesion margins. It ensures complete treatment of the affected area.
Stryker 1688 AIM 4K Platform
While most systems target GI procedures, Stryker excels in surgical and multi-specialty endoscopy. It’s essential for laparoscopic and orthopedic surgeries.
- Feature: Delivers 4K quality along with SPY fluorescence imaging.
- Advantage: The 4K quality offers four times more detail than typical systems, and SPY mode enables surgeons to observe real-time blood flow in tissues.
- Benefit: This helps surgeons work with greater clarity and precision, reducing complications and speeding up patient recovery after surgery.
Ambu aScope (Single-Use Platform)
For hospitals focused on infection control and quick responses, Ambu leads in disposable endoscopes. It’s especially useful in ICUs and emergency settings.
- Feature: A fully sterile, single-use endoscope that connects to a portable high-def monitor.
- Advantage: It eliminates the need for complicated cleaning processes and equipment transport.
- Benefit: The risk of patient cross-contamination is removed, along with the costs for scope repairs and cleaning supplies.
How to Choose Endoscopy Systems for your Hospital
For patient your clinical workflows, consider these tips:
Superior Image Quality
The main job of an endoscopy system is to provide clear images. Surgeons and doctors depend on precise visuals to find issues or carry out delicate procedures. Focus on systems that provide:
- High-Definition (HD) Resolution: Sensors should deliver clear, noise-free images.
- Advanced Lighting: Get systems that use special light modes, like narrow-band imaging.
- Natural Colors: The endoscopy camera system should represent tissue colors to differentiate healthy and diseased areas.
Comfort and User-Friendliness
If the endoscope is hard to control, it can make long shifts challenging. Evaluate the equipment for:
- Easy-to-Use Handles: Controls should be comfortable and respond to small movements.
- Lightweight Design: Lighter scopes help reduce the risk of strain for medical staff.
- Simple Controls: An easy control panel helps staff adjust settings without going through complicated menus.
Durability
- Durability: Opt for scopes with strong parts and materials that can withstand wear.
- Reliable Reprocessing: Ensure the system can endure your hospital’s cleaning process without frequent issues.
- Repair Data: Investigate the “mean time between failures” (MTBF) for models.
Compatibility and Upgradability
Before you buy, confirm that the new system will fit with your existing setup.
- Monitor Matching: Will the new system work with your current surgical displays?
- Software Compatibility: Can the system save images and videos directly in your Electronic Health Records (EHR) or Picture Archiving System (PACS)?
- Room to Grow: Can you add new features or updates later, or will you need a new system when technology improves?
Vendor Assistance and Training
A sophisticated endoscopy system is effective only if your staff know how to use it. Good vendor support is as necessary as the equipment.
- Loaner Options: If a scope needs repair, does the vendor offer a temporary replacement to maintain your surgical schedule?
- Quick Support: Check how promptly the manufacturer’s service team addresses problems when a system fails.
Total Cost of Ownership (TCO)
Consider what it will cost to maintain the system over the next five to ten years. This should include:
- Energy Usage: Modern LED systems use less electricity than old halogen lights.
Top Endoscopy Systems (The Comparison)
| System Model | Primary Strength | Key Image Tech | Best For |
| Olympus EVIS X1 | High-contrast detail | TXI & RDI modes | Detecting bleeding & early lesions |
| Fujifilm ELUXEO 7000 | Artificial lighting | Multi-Light Technology | Identifying mucosal changes |
| Pentax OPTIVISTA EPK-i7010 | Digital zoom & clarity | i-scan OE | Narrow-band tissue analysis |
| Stryker 1688 AIM | Versatile integration | 4K fluorescence | Complex surgical procedures |
System Breakdowns:
Olympus EVIS X1
This system is great at detecting hidden problems. Its Texture and Color Enhancement Imaging (TXI) brings out slight changes in tissue texture. The Red Dichromatic Imaging (RDI) mode helps doctors identify bleeding sources.
Fujifilm ELUXEO 7000
Fujifilm stands out with its special four-LED light source that creates different viewing modes. It can quickly change light wavelengths, letting doctors switch from regular white light to enhanced vascular views just by pressing a button.
Pentax OPTIVISTA EPK-i7010
Pentax highlights the power of digital enhancement. Its i-scan Optical Enhancement (OE) technology uses light filters to make the edges of polyps and tumors clearer. This system provides sharp, high-definition images, aiding doctors in making quicker decisions during screenings.
Stryker 1688 AIM
Stryker designs this platform for today’s operating rooms. It offers 4K resolution and works well with other surgical tools. The AIM platform supports fluorescence imaging, giving surgeons instant visual feedback on blood flow and tissue health during surgeries.
Read also: Laparoscopy Equipment’s: The Top 5 to Buy for Your Hospital
Final Thoughts
The endoscopy systems set a new benchmark for clinical efficiency and patient safety. Its advanced imaging provides clear views, enabling doctors to identify issues and carry out smooth procedures faster. Hospitals investing in this technology enhance both diagnostic precision and workflow efficiency.
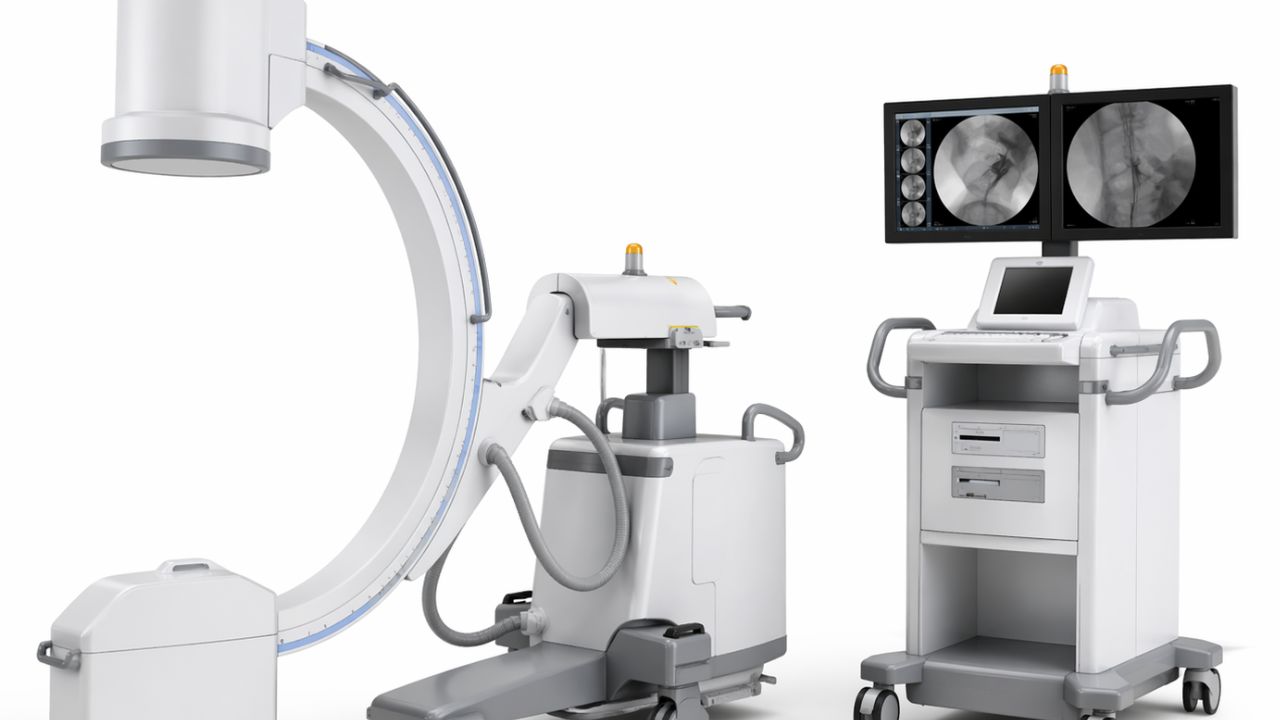
C-arm imaging machines for operating rooms need to balance surgical accuracy and budget. C-arms are part of modern fluoroscopy, as they provide real-time X-ray assistance during complex procedures. When choosing the right machine, look for high-resolution imaging that limits radiation exposure and keeps maintenance costs low.
Whether you want advanced 3D imaging for orthopedic operations or an affordable model for general surgeries, there are numerous options on the market.
In an operating room, you may see a piece of equipment that looks like a giant, metallic letter “C” on wheels. It’s a C-arm machine. A C-arm is a mobile X-ray unit that allows surgeons to see “live” images of the inside of your body while they perform the procedure.
Why Is It Called a “C-Arm Machine”?
The name of the machine is quite apt: it features an arm that connects an X-ray source and an X-ray detector. The arm is shaped like a “C,” so it rotates easily around the patient. This means doctors can get images from almost any angle without having to get up and change the patient on the operating table.
What Is a C-Arm Machine Used For?
In the past, surgeries often required large, invasive cuts because doctors had to see what they were cutting. But today, with C-Arm technology, surgeons can carry out “minimally invasive” procedures.
Here are the most common ways this tool is used:
Orthopedic Surgeries (Bone Repairs)
When treating a bone fracture and need to fix it with rods, plates, or screws, a C-arm can be an excellent tool for the surgeon. It can scan in real time and allow the surgeon to place the hardware precisely and correctly before ending the procedure.
Pain Management Injections
People with chronic back or neck pain go to the clinic for targeted injections. The doctors use the C-arm to guide the needle to the exact spot on the spine to ensure that it gets to the right place.
Cardiac and Vascular Procedures
C-arms are an important tool in cardiac and vascular operations. It passes a contrast dye into the blood, and it can identify and treat blockages or to place stents.
Pacemaker Implantation
For those who need a pacemaker, the doctor must direct fine wires through the veins.
What are the 7 types of Imaging?
In addition to the C-arm, health practitioners also use a variety of imaging devices to scan inside the body. Here are the most common imaging techniques.
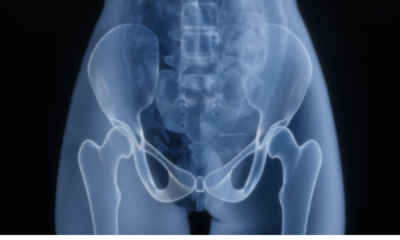
X-Ray (Radiography)
Most commonly used, this method uses a small amount of radiation to create a two-dimensional image. This is used to detect fractures, dental cavities, or pneumonia.
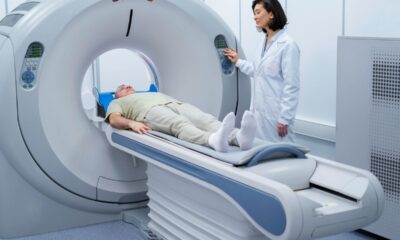
Computed Tomography (CT Scan)
Using a CT scan, radiologists take multiple X-rays from different angles. Computers assemble these images into “slices” of the body. This gives doctors a clearer view of organs and tissues than with an X-ray.
Magnetic Resonance Imaging (MRI)
MRI technology doesn’t rely on radiation. Instead, it uses powerful magnets and radio waves to produce body maps. It is considered the best method for examining soft tissues, such as the brain, spinal cord, muscles, and ligaments.
Ultrasound (Sonography)
Ultrasound uses high-frequency sound waves to generate images. It is entirely safe and free from radiation, which is why it is the preferred option for monitoring pregnancies and assessing blood flow in veins.
PET Scan (Positron Emission Tomography)
A PET scan involves a radioactive tracer to visualize the functionality of your body’s tissues, rather than just their appearance. Physicians often use this technique to monitor diseases like cancer or evaluate heart health.
Fluoroscopy
This device is used for fluoroscopy, which acts like a live X-ray film. It enables doctors to observe joint movement or track the flow of liquids (such as contrast dye) through the digestive system in real-time.
Nuclear Medicine
Nuclear medicine involves introducing a small amount of radioactive material into the body to emphasize certain areas. It detects early signs of disease in bones or organs that other imaging methods may overlook.
How much do C-Arm Imaging Machines Cost?
Prices are not always available and may require you contact suppliers for a quote. So, what’s the cost of a C-arm machine? Prices range from $20,000 to over $250,000. We’ll consider these things:
1. New vs. Refurbished
New C-Arms ($100,000 – $250,000+): Opting for a new model ensures you receive the latest Flat Panel Detector (FPD) technology, a comprehensive manufacturer warranty, and the longest operating life. For intricate vascular or cardiac procedures, a new machine is better.
2. Refurbished C-Arms ($35,000 – $90,000)
High-quality refurbished models from brands like OEC or Siemens can match new units’ performance at half the cost. It’s vital to buy from a reliable vendor with a strong warranty.
3. Used/As-Is C-Arms ($20,000 – $35,000)
This option carries risks. Initial savings might seem attractive, but an unexpected failure, such as a faulty image intensifier, could require a $15,000 part replacement soon after buying.
Types of C-Arm Technology
Image Intensifiers vs. Flat Panel Detectors
Traditional C-arms come with image intensifiers, recognizable by their large bell-like shape. They are dependable and economical.
Modern C-arms, however, feature flat panel detectors, have higher resolution, and are durable.
C-Arm Sizes and Applications
The type of surgery will dictate the C-arm size to get. For example:
Mini C-Arms
($30k – $70k): Ideal for treating hands, feet, and extremities, making them perfect for orthopedic practices.
Full-Size C-Arms
($50k – $150k): Versatile and suitable for spine, pain management, and general surgeries.
Vascular/Cardiac C-Arms
($100k+) Designed for high-power operations (with 30kW generators) and equipped with sophisticated software for vascular imaging, these are the priciest models available.
C-Arm Imaging Machines: Top 4 Brands
Below are some of the leading C-arm models in 2026.
OEC Elite CFD (GE Healthcare) C-Arm Imaging Machines
Renowned for its status in surgical imaging, the OEC Elite is one of the most used by surgeons.
- Feature: High-definition CMOS flat panel detector.
- Advantage: Delivers sharp images and still reduces radiation exposure relative to older systems.
- Benefit: Enables your team to handle complex procedures in orthopedics, vascular, and cardiology. It reduces the risk of repeat operations and enhances patients’ safety.
Ziehm Vision RFD (Ziehm Imaging)
For facilities focused on intricate vascular surgeries, the Ziehm Vision RFD supports your operational needs.
- Feature: Robust 25kW liquid-cooled generator.
- Advantage: Supports lengthy and demanding surgeries without overheating or lessening image clarity.
- Benefit: Minimizes downtime for machine cooling, allows more time for patient care, and boosts your surgical efficiency.
Philips Zenition 70
Philips emphasizes “Unified User Experience.” It makes sure that the machine is highly user-friendly for your team.
- Feature: Tablet-like touchscreen interface.
- Advantage: The intuitive software simplifies learning and controls.
- Benefit: Cuts down on training time and prevents technical delays. Keeps your surgical team efficient and focused.
Siemens Healthineers Cios Spin
For surgeons that specializes on spinal or trauma surgeries, the Siemens Healthineers is recommended.
- Feature: Complete 3D navigation and in-surgery CT-like imaging.
- Advantage: Allows real-time verification of implant placements right in the OR.
- Benefit: Lowers the necessity for additional surgeries. Save money and enhance patients’ recovery.
How to Choose the Right C-Arm Machines for Your Facility
Consider these questions:
- What is the main focus of my practice? (Orthopedics, Vascular, Pain Management, or General Surgery?)
- Is image quality my priority? (Think about CMOS flat panel detectors.)
- How much floor space is available? (Some models are for smaller clinics.)
When investing in brands like GE, Ziehm, Philips, or Siemens, you’re securing the following:
- Reliable Uptime: Reducing calls for repairs.
- Advanced Radiation Safety: Ensure the well-being of both your staff and patients.
- High Resale Value: These models maintain their value longer compared to cheaper alternatives.
The Factors to Consider:
1. Image Quality: Flat Panel vs. Image Intensifier
Before, C-arms were equipped with image intensifiers (II), known for their large, drum-like appearance. These devices are dependable and cost-effective, but they use older technology. Nowadays, many modern medical facilities prefer Flat Panel Detectors (FPD) for the following reasons:
- Zero Distortion: Flat panels deliver clear, square images without the “fisheye” effect associated with outdated models.
- Reduced Radiation: These detectors need a lower radiation dose to yield high-quality images.
- Streamlined Design: Being flat, they are easier to position around patients and surgical tables.
2. Power and Generator Capacity
C-arm machines have different power capacity like:
- 15kW to 25kW Generators: Suitable for intensive tasks such as vascular, cardiac, or bariatric procedures.
- 2.5kW to 7.5kW Generators: Optimal for orthopedic surgery, hand operations, or pain management.
3. Mobility and Space Efficiency
Consider the space in your hospital. Before you buy, think of these factors below:
- Does it have a rotating anode?
- What is its lateral travel capacity?
- Is it easy to move in tight spaces?
4. Refurbished vs. New Equipment
Buying a certified refurbished C-Arm from a trusted dealer can save between 30% and 50% of the cost of a new unit. However, for used devices, ensure the dealer offers a warranty and detailed tube life records.
5. Software Compatibility and Connectivity
Your C-Arm interfaces should be able to connect with your office systems easily. Confirm that the device is DICOM compatible for image transfer to PACS systems or printers.
Comparison Table: C-Arm Imaging Machines
| Machine Type | Price Range | Key Feature | Best Use Case |
| Compact C-Arm | $25k – $50k | Small footprint | Pain clinics & podiatry |
| Standard C-Arm | $50k – $100k | Versatile imaging | Orthopedic surgery |
| Premium 3D C-Arm | $150k – $300k | Volumetric imaging | Spine & vascular surgery |
Final Thoughts About C-Arm Imaging Machines
Hospitals and surgical centers use C-arm imaging machines to deliver high-resolution, real-time X-ray images during major operations.
From orthopedic operations to cardiac interventions, surgeons depend on C-Arms for precise instrument guidance while the patient is on the operating table.
Whether you opt for a new model or a certified pre-owned unit, the right selection will improve your surgical capabilities and patient results. Do you have further questions about how these machines operate? Feel free to ask in the comment section!
Disclaimer: This guide is for informational purposes only. Consult your surgical team before you buy any medical equipment.
-
 Diagnostic & Hospital Equipments4 months ago
What Are Medical Devices? Types and Uses
-
 Uncategorized4 months ago
6 Best Heatmap Plugins – I Test, Review and Compare
-
 AI in Health care4 months ago
Remote Patient Monitoring in Modern Healthcare
-

 AI in Health care2 months ago
Digital X-ray vs. Film X-ray: Which is better?
-

 Review and guides4 months ago
CPAP Machines Buying Guide: The Best Models Doctors Don’t Recommend
-
 AI in Health care4 months ago
AI in Medical Imaging: What is Coming Next
-
 Diagnostic & Hospital Equipments1 month ago
PET Scan Machines: Understanding the Technology, and Usage
-
 Diagnostic & Hospital Equipments2 months ago
DEXA Bone Density Scanning: What You Need to Know About Bone Health